How to Speed Up Your Muse Website
Have you wandered how to make your live Adobe Muse site load faster? Is your Muse website too slow when loading it live in the browser? Well then, here are some Helpful Tips on How To Speed Up Your Adobe Muse website.
I’m more of a video guy and this is my first in-depth blog post/tutorial which I believe will help a lot of you guys speed up your final sites. So let me share some knowledge I gathered after years spent in Muse.
With these simple steps you can make your site load faster and rank better on Google PageSpeed Insights, on other speed checkers and, most importantly, in real-life live preview.
Having spent a lot of time working with Muse Designers it became clear to me that a lot of you guys are not optimizing your final Muse websites before uploading them to hosting and going live. So in this post I want to share some knowledge and my own techniques, in other words – things you should always do before making your Muse website live.
Why is it important to optimize website?
Finished the website design in Muse and ready to Publish or Export HTML? Think again, the job is not done there! If you completely jumped over optimizing your website for better speed performance and simply uploaded your website to a hosting, you (and the client you designed for) can kiss your amazing design good bye. Your beautiful design wont matter and you will lose 90% of your visitors simply because of one fact: NO ONE WILL WAIT MORE THAN 10 SECONDS FOR THE WEBSITE TO LOAD.
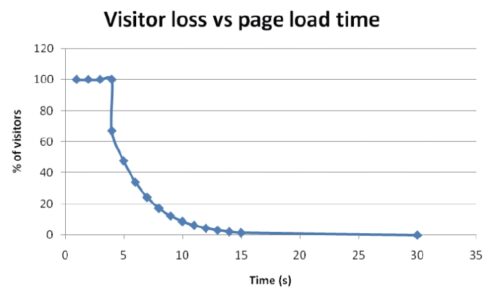
But don’t take my word for it, here is a graph depicting how many visitors you lose with each second they wait for your awesome page to load:
Source: pearanalytics.com
As you can see you definitely want to avoid the 4 Second Abyss of visitors loss. You can skip to the next heading if you don’t care for the details.
Notice how the visitors count starts plummeting after the fourth second. At the fourth second you lost 35% of your visitors, at the fifth you lost 53% and all the way to the 15th second where you should personally award the person who stayed so long for your glorious website to load. To put this in Muse perspective, if you go wild with the design, as many of Muse Designers do (trust me, I’ve inspected hundreds of Muse websites), you throw in awesome high quality pictures, graphics, load video backgrounds, parallax, use 20 widgets … you know, what every other Muse Designer does, your web pages will load in 10 seconds (probably more), and that’s a guarantee! Even if you think your website loads fast it’s because you either preview it locally while working in Muse or your browser has cached your live website for you. But what you really had to pay attention to was that first load of your live site. Remember when you only just uploaded your website to a hosting and the website was loading so slow, images were unraveling from top to bottom in slow motion, so slow that you had to suppress the memory that it actually happened. But then you refreshed your page and boom, it loaded in one second! Well, I hate to be the one to tell you this but that first gruesomely slow load is what your new visitors will experience and 90% of them will just leave, and the 1 second load you saw 99.99% other times you loaded your website was just browser showing you a website that it cached (stored to your computer). This first impression is very important on websites where you are trying to sell products or where you want to bring a lot of new visitors. You can also disregard our templates (the load time) or any other templates for that matter. Templates are built with “Everything ON”, showing all the options and all the pages available. Actual real-world websites shouldn’t have 10 homepages, 6 types of services pages and so on but instead a meticulously planned structure, limited but powerful effects and carefully selected information to show to the visitors. OK, moving on.
[INITIAL POST] In this post I will largely focus on one particular step you can do that will have a major impact on you page load times, and that is Optimizing Images.
Optimizing Images for Web Design
If you have never done image optimization you should definitely read on and even if you are regularly optimizing your images you should still keep reading because you as well will most likely find some helpful tricks on optimizing images for a live Muse website.
Let’s Start With a Theme
For demonstration purposes I will be using our own Ease Muse Theme. Firstly, I will demonstrate the wrong way of working with images in a Muse project and then the correct way.
Working with images in Adobe Muse – The Wrong Way
Loading full quality images in Muse
“I’m creating a high quality website, I should use highest quality imagery!” Right? Wrong! The worst thing you can do to your marvelous website is load your marvelous images (that you took on your glorious travels across the world) directly from your camera into Muse, this also applies to using the high quality images you downloaded from stock photo sites as well as using images as you received them from a client. And as some of you might think “Well duh!”, you might be surprised with the number of people doing this without knowing what it will later do. And we are not here to judge, we’re here to learn.
For my “wrong way” demonstration, I will simply be using some stock and CC0 images exactly in the size in which I obtained them.
Using images in their original dimensions
6048×3600 image, the larger the better! Right? Wrong! The second step, which is actually the first in the design process, is to prepare your image dimensions to fit their purpose on your page. For example, if you have a banner that is 1000 pixels wide and 400 pixels high on your web page, you most certainly shouldn’t use 6000-something by 3000-something image there and shrink it inside Muse. In many cases the large image will end up on your live website, immensely slowing it down!
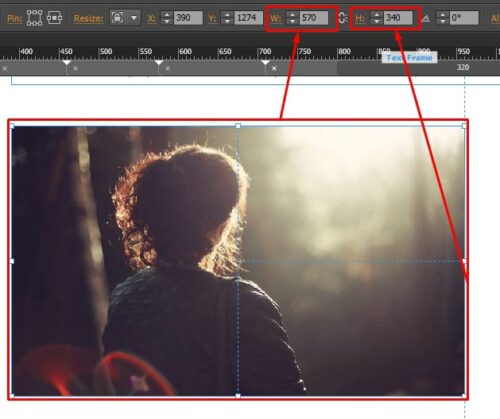
Preparing the image in correct dimensions is especially important when using an image as an “Image fill” for a Rectangle or a text frame. As shown on the image below, the rectangle is 570px wide and 340px high, if you insert a FullHD image (1920×1080) or a larger image (such as from your camera) Muse will export the large image!
Uploading a Muse website directly after you export HTML – Wrong!
Here is a simple statement which experienced Muse Designers should pay attention to, Your job is not done when you export HTML!
Here is a summary of how I treated images in Muse the wrong way all the way to uploading my website on hosing:
- I basically took the images in their original size and quality and placed them inside Muse
- I added two hero section images in 4K resolution
- I followed this method of loading the images in their original size and quality all the way until I finished my site
- After I completed my site I simply exported HTML (File/Export HTML)
- Finally, I uploaded my exported html to my hosting
On the image below you can see the final size of my HTML export (and that’s a one page site)
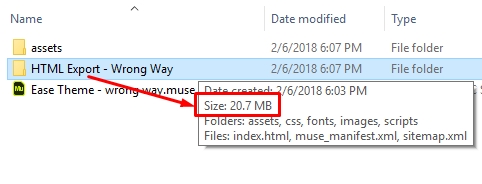
And Yes, this is the size of one page meaning only one page of my website has 20.7 Megabytes. This size will load insanely slow on more than 90% of your visitors’ browsers and you will lose all of those visitors because of your page simply not loading fast enough and, on top of that, your page will be practically unusable on mobile websites.
Later on, I will run speed tests on both this website and on my optimized version for comparison. For now, let’s move on and create this same website but this time I will apply my standard image optimization steps along the way.
Working with images in Adobe Muse – The Right Way
Firstly, it’s important to mention that nothing should get in the way of your design process. All of my steps can be applied at a later time, if you want complete freedom while designing then so be it, design away and when your Muse site is completely finished design-wise then you can start applying these steps.
Step 1 – Save a copy of originals
You will always want to keep your original images, so it’s best to keep them stored away in their original size and quality, in their own separate folder.
Step 2 – Create a dedicated folder for images specifically for this .muse project
Have an empty images (or assets/images) folder ready where you can drop copies of original images and crop, slice, resize them, delete them and so on. This is your playground for imagery.
Step 3 – Match image dimensions to project dimensions
This means go over your Muse project and (if needed), wherever there is an image, write down the sizes of your image placeholders (rectangles or image frames). NOTE: If you are creating a responsive website and have multiple layouts, always make sure that you prepare your image asset to match the dimensions to its placeholder, but on the breakpoint where the placeholder has the largest dimensions. This means, for example, if you have an image that is 400×300 on your largest breakpoint and you resized it to 600×400 on one of your smaller breakpoints (e.g. made it larger on your tablet layout), then prepare the image in 600×400.
You can use your favorite app for image cropping and resize, there is a lot of free and paid options available out there but my weapon of choice is Adobe Illustrator.
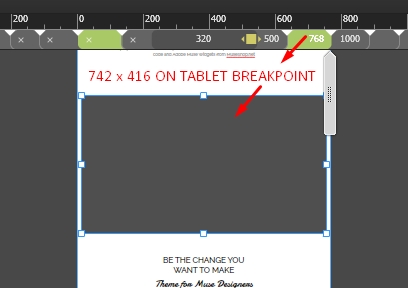
In my example, in Muse, the rectangle to which I will add my image (as “Image Fill”) has dimensions of 570×340 pixels. I will set that image fill to “Scale to fill” meaning my image will stretch to fill out the entire rectangle (rectangle will have different sizes on different breakpoints). Because of this I will have to check my other layouts (breakpoints) to see if I made the rectangle larger on any of them because I don’t want my image to get pixelated when enlarged.

So after checking my other 4 layouts I found that, while I was designing, I resized this rectangle to larger dimensions on my 768px breakpoint where it’s 742×416 pixels.
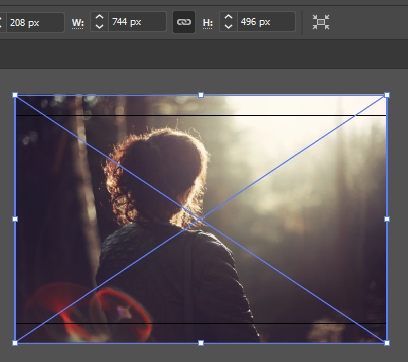
Now that I know my largest dimensions for this placeholder, I can prepare my image in that exact dimensions in Illustrator (or whatever program your are using). So I will
- open Illustrator,
- set my Artboard to 742×416 pixels and
- I will drag and drop the original image inside so you could see exactly how much larger it is.
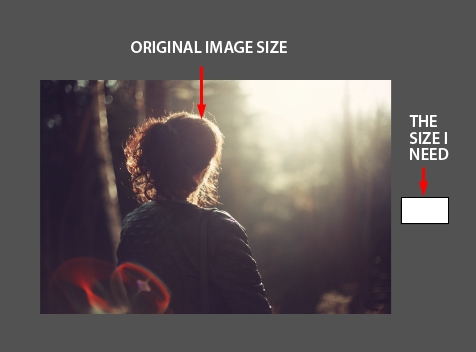
The difference in dimensions is substantial! As you can see as my original image is 5616×3744 pixels (3.16 MB – size on disk). Now I will simply center the image to my artboard and resize it so it is at least as wide (or tall) as the larger side of my artboard (TIP: and then a couple of pixels more to avoid the ugly white line appearing on the edge of the image).
Step 4 – Image quality optimization
Now that my image is resized to cover the artboard entirely (plus a couple of pixels more) I will export it as my optimized asset for my Muse project. In addition I will be using Adobe Illustrators “Save for Web” image optimization menu which will help me additionally reduce the file size. If you don’t use Illustrator and don’t have this option available don’t worry, you can do this online at a later time (explained below).
So, we have come to the last step in Illustrator, I will press Ctrl+Alt+Shift+S (or select File/Export/Save for Web) and in this menu comes the most important part of your image optimization.
The tricks Web Designers use when optimizing an image for web are:
- If your image doesn’t have transparency ALWAYS create a jpg image
- If your image needs transparency create a png image
- While optimizing, keep the image zoomed to 100% (original size, because you will be using your eyes to inspect quality), then
- Using the “Quality” input field, reduce the image quality until it starts to appear moderately pixelated (ugly) and then go back just a bit.
- Never use the same optimization parameters for multiple images, optimize each image individually and USE YOUR EYES! Some images will have 10% quality, some 30, 60 and so on.
- That’s it, you can now export. Don’t be afraid if there is a little pixelation showing – NO ONE will notice! If you don’t believe me, open any fast loading website and really look at the images. You will see some pixelation which your mind would never have detected unless you were specifically looking for it.
Back to exporting (Save for Web), when I applied the optimization described in the steps above, these were the parameters I used for this sample image:
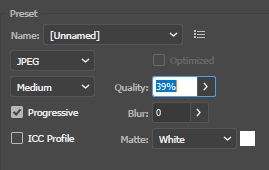
As you can see, I exported a JPEG image with 39% quality. It was “Art optimized”, there is also a “Type Optimized” option which is better suited when an image has important text on it (such as a straight text logo) but type optimized option will make images without text look too sharp, which is not a good combo when reducing quality.
My optimized image yielded the unnoticeable 16 KB (Kilobytes) in size which is … drum roll … A HUNDRED AND NINETY SEVEN TIMES SMALLER then the original. And it will literally load 197.5 times faster on a live website (now think about having thousands images on an ecommerce website and how much faster the optimized one will load).
And here are the compared visual results for Original Image (left) VS Optimized Image (right):

The optimized image (right) produced 197.5 times smaller file size = it will load 197.5 times faster on live website
Of course, there can always be exceptions. For example you might want a razor sharp image of your product in the hero section. Then you should also optimize but to a higher quality, maximum image quality is almost never needed for web and even 70-90% quality will still shave a lot of bytes from your images. One thing to pay attention is color, with quality you also lose color (it is noticeable under 40% or 30% quality on most images) which can be important if your priority is to preserve the perfect shade of a color. Vivid colors, especially red and green simply demand high quality so don’t go wild with those.
I have used my methods for the entire website and finished optimizing and placing my final images, then I exported my HTML, but the job is not done there!
Let’s just stop for a second and compare the exported HTML of our two websites, the one done the wrong way and the correctly optimized one:
The site built the wrong way was 20.7 MB in size if you remember:
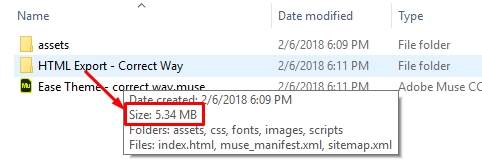
And my optimized website is 5.34 MB (almost 4 times smaller)
Step 5 – After exporting HTML
This is where experienced Muse Designers (and the guys that don’t have Illustrator or other image optimization program) can jump in.
For you guys that didn’t use Illustrator, I hope you at least cropped your images to correct dimensions.
In a typical, pure HTML, website (aka not a Muse website), properly optimizing the images as described above (the method can be used for all HTML websites) is where your optimization would be completed, but not for us Muse guys.
Muse is, in kind words, not praised by professional developers and this has all to do with the, by some opinions, “loads of junk code” it exports with every page. Comments such as “unreadable” code are most common. But hey, this doesn’t concern us Muse designers much since we’re all about designing (and those developers are always welcome to write a program that miraculously turns our crazy designs into human-looking HTML/CSS/JS/PHP code). Well this would be true, us not having to care, if that “junk” didn’t slow our final websites so bloody much.
Adobe actually praised Muse’s new image optimization system which takes place at Publishing or HTML Export and which should do this image optimization job for us. But I tested this out myself and the real life results are not as great as Adobe would hope for. Firstly, and this is a big miss by Adobe, if you added transparency to an image (either on hover or any other state) Muse will create extra large, completely unoptimized, PNG files which it will combine with your original optimized JPEG to mimic the “no transparency to transparency” transition thus adding a completely unnecessary additional large image. This means, even if you’ve masterfully optimized your JPEG image and wanted to use any kind of transparency on it, after the HTML Export (or publishing) all your hard work will have been done for nothing because Muse will have enlarged your total size of assets related to this image by at least five times. Second big miss by Adobe is that there is practically no image optimization happening to PNG images, they simply come out as huge .png files. But, these major page-slowers aside, the images that do get optimized by Muse in the export process can be further optimized to much smaller sizes and without losing any noticeable visual quality.
This is why you have to further optimize your exported assets.
To continue, what I do after exporting:
Duplicate your exported HTML folder on your computer
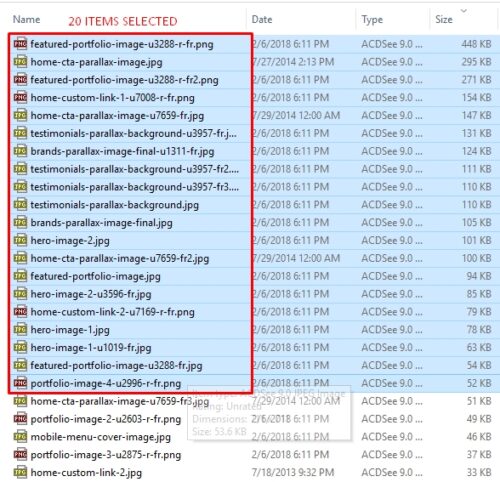
Open up the folder, inside open the “images” folder and (in Windows) set the view to “details” and sort your items by “Size”.
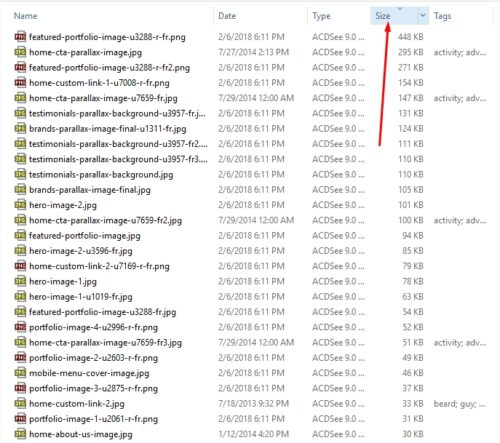
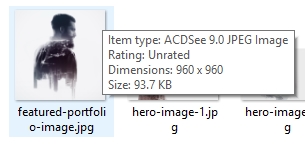
You can already notice that the largest image in the folder is a PNG (448 KB = 0.45 MB) and that it has that “u-3288-r-fr” tag added to its title (meaning it was automatically generated by Muse during HTML Export/Publishing). In other words, I never created this image but Muse made sure I got it.
My original image was a JPEG (93.7 KB = 0.09 MB), five times smaller.
In fact Muse has not created one but three additional images enlarging the size of assets related to this one single image to 867 KB which is 9.22 times larger that my initially optimized image.

This equals to 9.22 times slower load of this image on the live website. And 867 KB of assets for one image? In pure HTML websites, you could easily build the entire page with 20+ images and still keep it smaller than 867 KB.
This is why you have to further optimize your exported assets, but there are good news, enter TINYPNG.COM
When you have your “images” folder view (mentioned above) set to “Details” and the folder content sorted by “Size”, the next thing you should do is visit this awesome little website called tinypng.com – When I found TinyPng, I was amazed by its simplicity and effectiveness. This is a small online image optimization website that will do wonders to your image sizes (especially PNGs) and it’s exactly what we are going to use to further optimize our images after HTML Export.
![]()
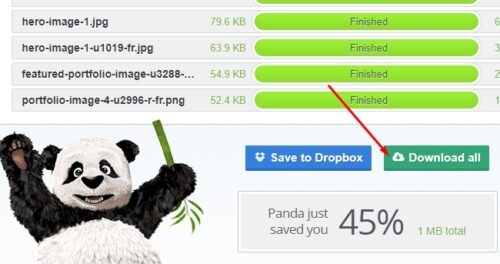
TinyPng works like this: You can drag-and-drop-upload up to 20 images at once and as soon as you drop them the website will start uploading and optimizing them. You shouldn’t wait for long and your optimized images will be ready for download. Then you have two options, to download images one by one or to download a zip file containing all 20 images. I usually download the zip file. So what you need to do is to select twenty largest image files (starting from the top if you sorted your files by size) and drag-and-drop them onto tinypng website and wait for them to optimize.
Selecting,

uploading,
Done!
Click Download all and in the duplicated folder of the HTML Export you created, create a folder titled “images – tinypng”, that’s where you should save the zip file.
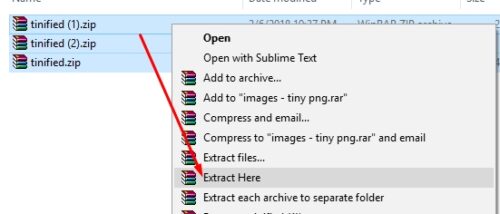
Next, reload tinypng homepage, select the next batch of 20 image files on your computer and repeat the process. You should keep repeating this uploading and saving zip files until you reach images below 10KB in size (or, if you are a perfectionist you can optimize them too but they won’t make much of a difference). When you are done, you should end up with at least a couple of downloaded zip files (depending on how large your website was).
Unzip the zip files in the same folder
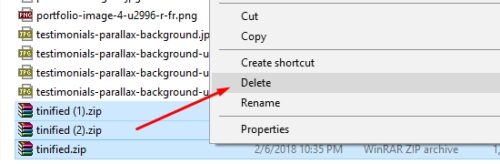
After the extraction delete the zip files from the folder
Now copy all the images and go up one folder, open the “images” folder and paste and replace original image files with your small images.

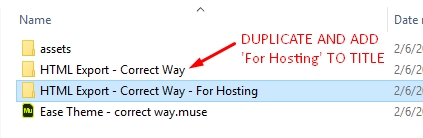
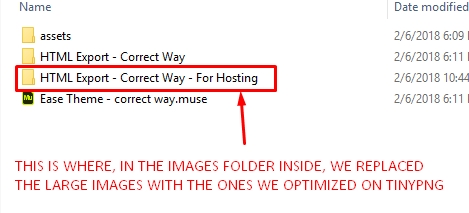
Now delete the “images – tinypng” folder since you don’t need it anymore (or do you? If you want to keep it, remove it from the current HTML export folder). What you end up with should be:
- The HTML Export Folder of your website directly from Muse
- A copy of that folder with ” – For Hosting” added to the title where, inside the “images” folder, now you have replaced the large images with the ones you optimized on tinyPNG (and the “images – tinypng” folder either deleted or removed from this folder)
And that’s it! Now lets compare the sizes of the final files Muse exported with the final files after we optimized our images on tinypng:
No further optimization after HTML Export/Publishing produced a 5.34 MB website
Further optimization after HTML Export/Publishing produced a 3.86 MB website
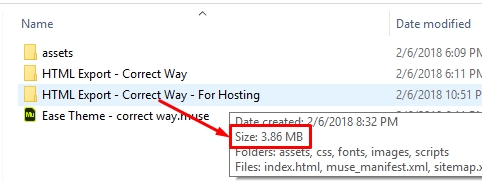
We reduced the size by additional 1.48 Megabytes which will load our page one to two (or even more) critical seconds faster than it would if we didn’t optimize after the HTML Export. And this extra one second shaved off your page load time will get you 35% more visitors.
Optimization Results
Firstly, let’s look at how much we reduced our initial site, here are the sizes of the website export done the wrong way and then our final, fully optimized website:
Final HTML Export done the wrong way – 20.7 MB (One page only)
Final HTML Export with optimizing images before placing them in Muse and re-optimizing after the HTML export – 3.86 MB (One page only)
We reduced our project by 16.84 MB, in other words our optimized website is 81.3% smaller and thus faster!
3.86 MB page is not something to be proud of in web design but it certainly is in Muse web design. Muse high five!
Let’s Test The Speeds!
Let’s check the final speed of our websites. I have uploaded both the initial website and the optimized website to my hosting so let’s check out the results.
One thing to have in mind is that Muse generates the final code automatically and this code will trigger a lot of notifications and warnings on speed testing websites. We will simply disregard any notifications and/or warnings the speed testing sites find because this would require actual coding knowledge (and in most cases completely rebuilding the HTML Muse exported) which is not the theme of this post. The warnings and notifications will appear for both websites, and since we, as Designers, can’t have control over that we will focus on the overall scores of the two websites and especially on what the image optimization has achieved. OK, so let’s run the tests:
Test 1 – Google PageSpeed Insights
Google requires some time to pass before it collects real world performance data about my two newly uploaded websites so I will update this blog post when the results become awailable.
Test 2 – Pingdom.com
Unoptimized final website

Optimized final website
Pingdom results – Page Load Time (lower is better)
Optimized website has a 44% better load time
Pingdom results – Faster Than (higher is better)
Optimized website has a 25% better speed against other real world websites
Pingdom results – Page Size (lower is better)
Optimized website has 84.2% lower page size
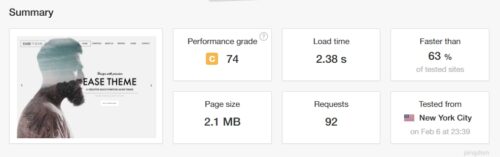
Test 3 – GTmetrix.com
Unoptimized final website

Optimized final website
GTmetrix results – PageSpeed Score (higher is better)
Optimized website has a 65% better PageSpeed Score while unoptimized website completely fails the test
GTmetrix results – Load Time (lower is better)
Optimized website has 10.87% faster load time
GTmetrix results – Total Page Size (lower is better)
Optimized website has 84.1% smaller total page size
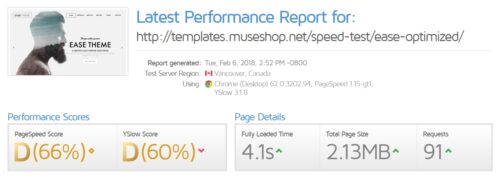
Test 4 – WebPageTest.org
Unoptimized final website

Optimized final website

WebPageTest results – Load times and Fully Loaded times (lower is better)
Optimized website has 46.08 faster load time and 48.78 faster fully load time
Final Result from Speed Test Websites
The optimized website scored 51% better in a combined overall score.
Final Result in Real Life
I didn’t stop at machines measuring machine stuff. Since I like to check things out for myself, after I ran all these tests, I measured the real-life load time of both unoptimized and optimized websites. And by real-life I mean that I cleared my browser cache and history, pasted in the direct link to the page for each page and, by using a stopwatch, I measured the time between the moment I pressed enter to load the page until I saw the hero section fully appear. And the results were amazing:
- The unoptimized website appeared after 14.69 seconds
- The optimized website appeared after 3.68 seconds
And THIS is the clear as day and most important result I was looking for. To see the pages load from the same hosting on the same computer with my own eyes.
The optimized page appeared before me the stunning 11 seconds faster and obliterated the unoptimized page by loading 74.55% faster!
Remember that graph from the beginning of the post? Here it is again but this time, having the real life page load times measured, I hope you will see it in a new light:
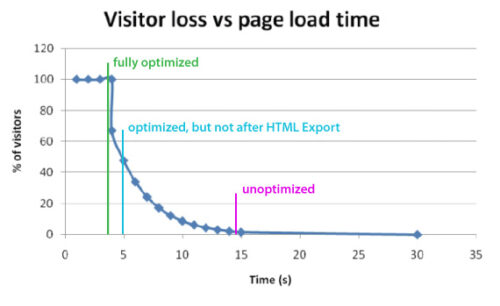
What does this mean?
We can now see some hard facts:
- Our fully optimized website had no noticeable visitor losses
- Our optimized website, but without optimizing after Muse does the HTML Export/Publishing, lost 53% of the visitors
- Our unoptimized website lost practically all visitors
- Notice that 1+ seconds we shaved off with optimizing after HTML Export, well that one second has more than doubled our visitors
In conclusion, if you really value your work as a Muse Designer, find the time to optimize your websites after you are finished designing because, if you don’t, you risk losing the vast majority of your visitors. If you design for a client, they won’t be happy with their websites not performing. All of this has all to do with your reputation as a Web Designer – Muse Designer because, ultimately, if your websites don’t perform, your clients will go elsewhere (and they talk).
[FOR FUTURE UPDATES]
This post had was dedicated to image optimization because it is the easiest one to do as a Graphic Designer with no code knowledge. It also happens to have the most effect on the actual page load time so that’s great for us Designers. In the future I plan on writing more optimization tricks that can be done without coding, I’m still to decide whether to put those in this post or in a new one. I might also go over what you can do with your code but I’m yet to figure out the approach because that will require at least basic coding knowledge.
Additionally, there are some niche websites that actually make the visitors wait, like websites for Web Design / Graphic Design / Photography / Producion studios, agencies and professionals but this is all a story for another time. All I will say in regard to this is that these types of websites are created by people with coding and design skills so high that even the waiting is designed and, once the curtain is lifted and the website loaded, you are in for an experience that tops the current blockbuster movies (in short, I wouldn’t recommend it and you will know for yourself if you are ready for that kind of endeavor).
If you found this post useful, share it so your Muse Designer buddies could also benefit from it and leave a comment if you wish, I’d like to hear your views. Maybe there is something I overlooked with image optimization.
Bye!
by Dragan
Dragan is the founder of MuseShop.net and SkilltechWebDesign.com
Experienced Graphic and Web Designer, Creative Cloud expert and Audio Production ninja.
Share this post
Author
Elite Adobe Muse Themes, Widgets, Tuts & more... Creators of Best-selling Adobe Muse templates and Muse widgets. MuseShop.net is raising the bar in Muse design with awesome new products.

Leave a Reply
You must be logged in to post a comment.